|
|
Nikki Hopkins
Customer Support Representative
|
|
Finally, here's a secret that most web designers use in creating a well-designed site. Have you ever looked at a news/newsletter site, or saw a corporate site like hp.com and thought, I want my site to look something like that." You too can accomplish this by using EZ-NetTools� with the added boost of a Layout Manager.
What is a Layout Manager?
A Layout Manager is actually just a fancy term for a table, for which you can add EZ-PageBuilder blocks in columns and rows. If you want to create a more advanced design, add another layout manager within your existing layout manager, to create rows within your columns.
With the layout manager, you can control the placement and size of your blocks, whether you want to set them right next to each other side-by-side, or underneath each other.
Why use a layout manager?
The layout manager allows you to control the size, placement, background color, and even background images of your blocks. For example, you might want to add color behind a text block. You can do that by adding a layout manager before your text block. While adding the layout manager, be sure to add a background color. Then move the text block up once so the qualities that you specified in the layout manager will reflect in your text block.
Step-by-Step Example
 We're now going to try to copy the general layout we saw earlier of hp.com. Click the HP logo to view a screenshot we took from the hp.com website. First, you will need to change your table width to 750 in Global Information. We will just use white for the background color of our website. We're now going to try to copy the general layout we saw earlier of hp.com. Click the HP logo to view a screenshot we took from the hp.com website. First, you will need to change your table width to 750 in Global Information. We will just use white for the background color of our website.
Now, you are going to need sample graphics to complete our tutorial. Save the two graphics below to your desktop. For most users, this mean that you'll right click on the each picture and choose "Save Picture As�" Then, open your EZ-FileManager and upload the two graphics to your EZ-NetTools account.
|
|
|
|
|
|
Next, open EZ-PageBuilder and create a new blank page. The first block to add is a Text block. Type "June, 2003" for the text and make it right aligned. Use the Font | Color | Size button to change the font color to slategray, and font face to Verdana, size 2.
You will now start using the layout manager to create our design. Click here to view an adaptation of hp.com that you will be creating. The long blue strip at the top of the graphic is the header graphic. Just below that, you can distinguish three distinct columns: the first column with the logo, the second column with a graphic, and the third column with information. So after block 1, you will add a Layout Manager Block. Choose the Layout Style as "Columns" (which is the default), and Submit it. Now, any blocks that you add directly after this layout manager will be arranged horizontally.
Here's the tricky part. Look at the screenshot again. The information in the 3 columns is stacked on top of each other, or in other words, are in rows. Keep that in mind. You will need 3 more layout managers to add these rows inside each column. To do this, click the Add button at the top-right of PageBuilder, or the small  sign in block 1. Add a layout manager block and click "Next Step." This time, for the layout type, choose "Rows" and click Submit. Next, add another layout manager, but be sure to add it after block "2.1 - End Layout." The position of this block is very important. Again, the layout type needs to be set as rows. Next, add one last layout manager after "2.2 - End Layout" with the layout type as rows. sign in block 1. Add a layout manager block and click "Next Step." This time, for the layout type, choose "Rows" and click Submit. Next, add another layout manager, but be sure to add it after block "2.1 - End Layout." The position of this block is very important. Again, the layout type needs to be set as rows. Next, add one last layout manager after "2.2 - End Layout" with the layout type as rows.
Let's stop here and see if you took the correct steps. Click here to see if you're on track. If you're not, read the last paragraph again carefully and make sure you took the correct steps.
Now that you have our layout ready, you can begin to add content to the design. Click the Plus sign in block 2.1. Add a graphic block. Find the logo.jpg file that you uploaded earlier and select it for your graphic. Choose center for the alignment and click Submit.
Next, add 3 spacer blocks in a row. The first spacer block will have a height of 5, the second and third spacers will be 8. Do not worry about entering anything for the width.
Add a Bulleted Text block after your last spacer block. Select the bullet type as Square and click the First Column button. Now add the following text in each row for your text:
|
|
- Home
- Catalog
- Store Locations
- Order Form
- About Us
- Contact Us
|
|
Change the font to Verdana, size 2, and the color as white. Click Submit.
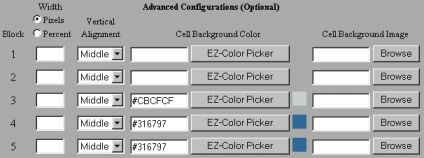
When you first click submit, you may not be able to see any of your text, as our background color is white as well as our text. Here's where the layout manager comes in again. Edit block 2.1 by clicking the Yellow Pencil (  ) sign. This time, you should see many more options in the Layout Manager than you did the first time. This is because you added blocks inside the first layout manager. Now that they are inside, the layout manager has control over the attributes of those blocks. You should now see 5 rows of information. Each of these numbers corresponds to the blocks that we added earlier. Because you added the Graphic block with our logo first, that blocks attributes (width, vertical alignment, background color or image) will be specified in row 1. Rows 2, 3, and 4 are for the 3 spacers we added. Row 5 is for your bulleted text. ) sign. This time, you should see many more options in the Layout Manager than you did the first time. This is because you added blocks inside the first layout manager. Now that they are inside, the layout manager has control over the attributes of those blocks. You should now see 5 rows of information. Each of these numbers corresponds to the blocks that we added earlier. Because you added the Graphic block with our logo first, that blocks attributes (width, vertical alignment, background color or image) will be specified in row 1. Rows 2, 3, and 4 are for the 3 spacers we added. Row 5 is for your bulleted text.
Type the Hexadecimal color code for the following rows:
|
|
- Row 3: #CBCFCF
- Row 4: #316797
- Row 5: #316797
|
|
|
View the screenshot below to see if your layout manager configuration matches mine.
|
|
|
|
Now click Submit. You should now be able to see how the layout manager affected our blocks with setting a background color.
The second column is fairly easy. Just click the add button for block 2.2 and add a graphic block. Browse to the mainpic.jpg file and open it. Click Submit.
Setting up the third column is similar to the first. Click the add button for block "2.3 - Start Layout".
|
|
- First, add a Title block with the text: "What makes our company worth your investment?" Change the font to Verdana, size 2, color: white.
- Add a Bulleted text block with the bullet type set to square with the text set to:
- Secure transactions, 24/7
- Prompt order response
- 30 day money back guarantee
Now, set the font to Verdana, size 1, color: white
- Add a Spacer block with the height of 7
- Add another Title block with the text: "Today's Specials". Font is same as the previous title block
- Add another Bulleted Text block with the same font and bullets type as above, but with the text:
- Free shipping for orders over $50.
- Free gift with every purchase!
- Add one last Spacer block with the height set to 7
|
|
|
Now, as you did with the first column, change the background color for these blocks. Edit block "2.3 - Layout Manager". Add background colors to correspond with the following screenshot.
|
|
|
|
Still hanging on? Good. You're doing great! You should have the top three columns from our original layout. If you need a reward for your work so far, select the View menu at the top of EZ-PageBuilder and choose "Preview Current." You should now see that your webpage is coming closer to being completed. In fact, you may want to save your changes right now while we're taking a break.
Now you will create the long gray line that goes across the middle of our webpage. To create that line, you will use a combination of a layout manager and a spacer. The spacer block doesn't have the option for a background color, so you will use the color options in the layout manager to add one.
First you will add a layout manager after block "2 - End Layout". Because you're only having one block inside this layout manager, we won't need to specify whether it will be in rows or columns. In this use of this layout manager, either one will work. Set the background color to: #C8C9D1 and click Submit. Next, add a Spacer block after "3 - Start Layout" with a height of 10. You will then see that the color of the spacer is now gray.
You're almost done! The links at the bottom of our page are created using one final layout manager, with several bulleted text and spacer blocks. Since we want our links to be placed side-by-side, we will use a layout manager set to columns. Originally, you might have wanted to add a simple Bulleted Text block and create many columns in that same block. But because you are adding a white vertical line in between each list of links, the layout manager is needed to provide a simple, yet powerful effect.
Next, add a layout manager after "3 - End Layout" and set it to columns. Add a Bulleted Text block after block "4 - Start Layout". Set the bullet type to None, and the font to Verdana, size 2 as we have done before. But this time set the color to darkslateblue and check the Bold checkbox. For the text, type: "Online Partners" for the first row and "Tips and Tricks" for the second.
Next, add the following blocks it the order as listed. For each Bulleted Text block, set the bullet type to None, choose center for alignment, and make the font Verdana, size 2, color: white.
|
|
- The first Bulleted Text block will contain the text:
- Widget 1
- Widget 2
- Widget 3
- Add a Spacer block with the width of 2
- Next, the Bulleted Text will contain the text:
- Widget 1
- Widget 2
- Add a Spacer block with width set to 2
- The last Bulleted Text block text is:
- Widget 1
- Widget 2
- Widget 3
|
|
|
The last step is simply configuring your last Layout Manager. Edit block "4 - Start Layout". Go to row 1 in the Layout Manager and set the Width to 180 pixels. For row 3 and row 5, set the width to 2 pixels each. Now, change the Vertical Alignment from Middle to Top for rows 1, 2, 4, and 6. For your very last step, change the color for rows 2, 4, and 6 to #073565. Now click Submit. Your changes should look like the graphic below.
|
|
|
|
Now, preview the page by selecting Preview Current again from the View menu. You can see what our new additions did to our page. The 2 width Spacer blocks added small lines between the links. Save your page again to use for future reference.
If you had some problems with this tutorial, go through it again to make sure you didn't miss any steps. You can also click here to view the complete PageBuilder layout.
Conclusion
Layout Managers may seem quite confusing at first. But once you understand the basic concept and functionality of the Layout Manager, your ideas and creations can be endless. Good luck! If you need further help or have questions on using the layout manager, contact Customer Support for assistance.
|
|
|


