|
Introduction 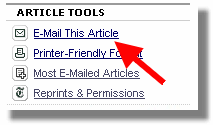 “Email this page to a friend.” This is free advertising. Such links are appearing on more and more web sites. This article will show you how to create such a link using form builder blocks in EZ-PageBuilder. “Email this page to a friend.” This is free advertising. Such links are appearing on more and more web sites. This article will show you how to create such a link using form builder blocks in EZ-PageBuilder.
Occasionally we have received suggestions to program an “Email this Page” link. The number of suggestions has not been large enough to warrant developing new tool to accomplish the objective. However, creative use of EZ-FormBuilder can accomplish most of the desired features. Basic concepts The basic idea of “Email this Page” is simple. A person visits your website. They think someone they know might be interested. By providing a link on the page you make it easy for them to send an email to their friend with a link back to your web site. This is a great way to build your referrals that will compliment your other marketing efforts. Besides, it is free. You can quickly build a simple “Email this Page” link using EZ-FormBuilder blocks in EZ-PageBuilder. If you have used EZ-FormBuilder before, you might be a little confused with the form I will show you how to build. Normally, when an email address is included with a form, it is used to send a confirmation to the person submitting the form. In this case, however, the email address submitted with the form belongs to the friend of person submitting the form. Consequently, the auto-response message must be carefully written so that the recipient will understand why they are receiving this message about a web site they know nothing about. The wording of the auto-response must be clear and include the complete URL to your web site. For example http://www.eznetadvantage.com/0409/ForwardPage.html. When this form is used, you will receive an email notification of the referral. Thus you will know how often the page is referred. You will also have the email address of the referring person. Creating the “Email this Page” form. For this example, we will build a very simple form, using only a few of the features of the form builder. Before we get too far, let me review some basic concepts of building a form. The form builder is a little more complex than most EZ-PageBuilder blocks. The first form builder block is like an envelop that contains the rest of the form builder blocks and has the configuration information about the form. When you see a list of EZ-PageBuilder blocks, you will see a beginning and ending form builder block. See graphic to the right. For this simple form, we will only need to add two blocks to the form envelop, one will be created automatically for you. Let’s build it. most EZ-PageBuilder blocks. The first form builder block is like an envelop that contains the rest of the form builder blocks and has the configuration information about the form. When you see a list of EZ-PageBuilder blocks, you will see a beginning and ending form builder block. See graphic to the right. For this simple form, we will only need to add two blocks to the form envelop, one will be created automatically for you. Let’s build it.
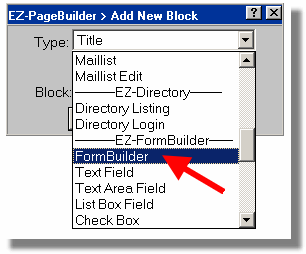
Begin by adding a new block. Select the first block listed under EZ-FormBuilder from the list of available blocks.
The first three data fields define the email that you, as the web master, will receive. From my personal experience, I have learned to put clear instructions to myself in here. The first time I completed a form I did not pay much attention since the entire process was very clear in my mind. However, several weeks after I completed the form, I received a real form. Because it was not fresh in my mind, I did not immediately remember the form. Consequently, my first response was, “Why is this person sending me this information.” As I have added more forms to more web sites over time, the situation became very confusing. Now, when I design a form I make sure that I clearly tell myself in the subject, exactly what the form is for. In the description, I include an even more detailed instruction, including what I should do with the information. 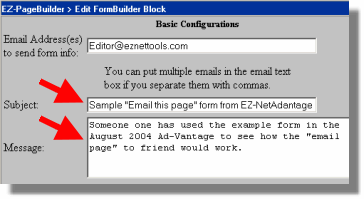
The next two data fields are used to determine where the person will be sent once they have submitted the form. I would strongly suggest that you always forward the users to a page that confirms that the form was submitted successfully. If you do not do this, there is little indication that their action was successful. They will likely try again. Besides it would be nice to thank them for the referral. So, even though it takes work to build a Confirmation Page, I urge you to do so. (TIP: At this stage I usually don’t have the confirmation page built, so using EZ-Browse I use the “Create a new EZ-PageBuilder File” function of EZ-Browse to build a temporary page which I later rework.) 
The next four data fields define what the email going to the person receiving the referral. This message is your one chance to get this person to visit your site. First, click “yes” to have the auto-responder sent. By clicking “yes” the system will automatically add a second block to the page, within the Form builder envelop. (As I mentioned in the introduction, the term “auto-responder” is not a representative term in this situation because it is not really responding back to the person submitting the form. Rather it is going to someone else.) In the return address, you will probably want to put the main email address for the web site. In the subject you will want to put something that will catch their attention. Finally, put on your best sales text in the message that will appear in the email. Be sure to make it easy for them to go to your web site by including a URL to your site. If you will be using multiple referral forms, you will want to put in the URL to the exact page the referral came from rather than your main Domain name. If you fill out my sample form, you will see what I mean. 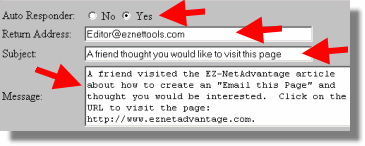
Although the next field is really optional, I suggest you give each form a unique form name. This is especially true if you put a link on several pages. You will want to know which pages are being referred most often. When giving the form a name, do not use special characters like quotes (‘ or “) and angle brackets (<>).

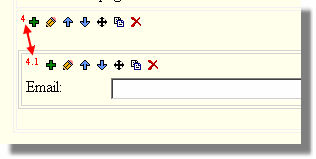
When you are done, submit the form. Notice that two blocks have been added to your page, the form envelop and an email form block. The email address block will have a number equal to the form block with a period and one (.1) appended to it. The period and one indicate that the email address block is included within the form block. (The Layout manager uses a similar numbering scheme.) When you indicated that you wanted an auto-response, the system generated a second block for the email address . You can modify this block, but do NOT change the “Field Name” in the advanced section.
The last step is to create the button to submit the form, called the “Form Button” block. Add this block right after the email block so that it is within the “envelop” of the form. In the label field, enter a words like "Refer this page." Make sure that the “Type” is “submit.” Then submit the block. YOU ARE DONE! 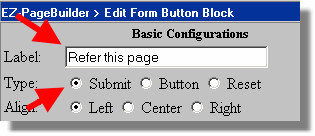
Conclusion Who knows how productive your “Email this Page” will be? But unless you try, you will never know. Besides, it is easy to do and costs you nothing. Since you will be collecting personal information, i.e. email addresses, you may want to link to a privacy policy page to help build the trust of those visiting your site and referring their friends. We recognize this is a very simple referral form. It has the advantage that it is easy for you to build and the person making the referral only has to fill in one piece of information. If we receive more interest from our members in adding more functionality such as including the name of the person making the recommendation and their comments, we will give the idea greater consideration.
|