EZ-Photo Album
EZ-PhotoAlbum, A Quick Start Guide1. IntroductionThe EZ-PhotoAlbum quick start guide will lead you through creating an on-line photo album with the minimum steps necessary. You will be surprised how quickly you can create a nice on-line album even though you only used the basic options. After creating your first album, you will want to put all of your photos on the web. To give you an idea of what EZ-PhotoAlbum can do, we have created several sample albums. You might want to take a quick tour. Now, let's get started. There are two parts to completing your album. The first step is to create an empty album. The second step is to add photos to the album. Simple! You will be done in no time. 2. Creating your First AlbumIn this step you will first create an empty album, giving it a title. For now, we will not worry about any of the other options because they are not required to create an album. In fact, even the title is not needed. From the Construction Tools, click on the EZ-Photo Album link. You will see an empty list of photo albums. Once you have added your albums, the list will be much more interesting. (The graphic at the top of this page is an example of the Album list.) 
Click on the Create Album. You will see information that will describe your album. For right now you will use the default values, except one. In the box next to Album Title type in any title you want, such as My First Online Photo Album. This is the second value you can enter. 
Click the submit button. You will now return to the list of albums that will now include the album you just created in the list. 3. Adding Photos to your AlbumOnce you have created an album, your next step is add photos to the empty album. This process is also called uploading your files from your PC to the web site. Click on the Upload button, which will take you to the File Upload page. Make sure the album you just created is selected in the second field, "Files will be uploaded to:" 
In the bottom half of the File Upload page, select the files from your computer you wish to upload. Click the Browse... button to display a list of files on your computer. Click on the file you want to upload. Continue selecting files until you have selected five files or less. 
Click the Upload button on the bottom of the page. You will see a summary of statistics about the files just uploaded. If you want to upload more photos, click Upload More Files and repeat the above step until you have uploaded all the files you want. When you are done click Close. You will be returned to the list of albums. Note: You can always add more photos later. CONGRATULATIONS! You have just created your first online Photo Album. The system will create all the web pages of the album. While you do not have to, you can see a list of the files by clicking on the album name in the All Albums list. 
4. Viewing Your Album Three Different WaysWhen you uploaded the photos in the previous step, the system automatically generated three types of web pages. First, a page with thumbnail photos is created; second, a separate web page for each photo; and third, a slide show page. Lets see what they look like.
From the album list click on the Preview link to the far right of the album title.
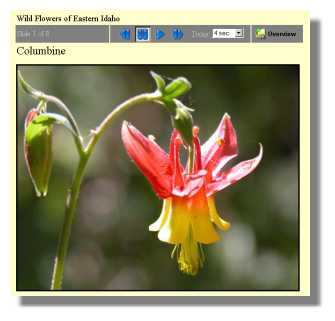
You will be taken to the page containing all the thumbnails. Note, the very first time you load this page, it will take a while for the page to display because EZ-PhotoAlbum is actually creating the thumbnails for the first time. After the first time, the page will display much quicker. Click on any thumbnail or file name. You will be taken to a page that will display the photo at its original size. If your photo is very large, you might want to consider resizing the photo before you upload it the next time. Click here for a short course on preparing photos for the web. Lets view the photos sequentially. Click on the blue arrow in the navigation bar to take you to the next photo in sequence.
Click on the Thumbnail link to return to the thumbnail page.
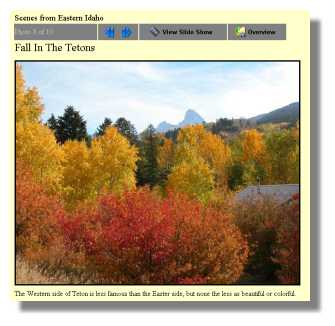
Click on the View Slide Show link to go to the slide show page. This page may take a while before it is completely loaded. Click on the blue, right arrow button to start the slide show.
5. Linking to your album, Letting Others View Your Album.Now that you have your album created, you will want others to view them. Since, EZ-NetTools® are always online, you simply need to know the address to view them. There are several ways to do this. Creating a Link using EZ-PageBuilder. Linking to an album using EZ-PageBuilder is a snap. Any Page Builder block that has a link (like Title, Graphic block, Button Bar, etc), can be linked to an album by using the Browse Button.
In the bottom third of the Browse window, select the file type of EZ-PhotoAlbum. Then you will only see the files associated with the photo album.
Click on the EZ-PhotoAlbum directory. You will see a list of all your albums.
Click on the album you want to link to. You should see only one html page called index.html
Click on the index.html to select the Thumbnail page to the directory.
Click open. You have now created a link to the Thumbnail page of the directory.
Direct address or URL. You or anyone you wish can link directly to your album pages by typing in the address or URL in the address bar of the browser. This can be a handy way to direct people to the album by just typing in this address into an email. Then people can link directly to the album from the email.
The way to find out the address (URL) is to put your mouse over the album name in the album list. As your cursor pauses for a few secords over the album name, the path will be display in a small window. Write down this entire path. Unfortunately, the window may disappear after a few minutes. You may have to hover the mouse over the album name several times. After you do this a few times, you will notice that only the last characters changes. That address will look something like this: http://abc.eznettools.com/eznetu/EZ-PhotoAlbum/Album01/.
Using the All Albums Page. In addition to the pages created for each album, there is a page created by the system that lists and links to each album. For some account types this will be the best way to link to and show your album, especially those whose account does not include EZ-PageBuilder. The "All Albums" page will display the first thumbnail, the title, and the first part of the description of the each album. See the example below.
To create a link to the "All Albums" page, use the EZ-PhotoAlbum filter in the Browse window. Navigate until you get to the EZ-PhotoAlbum folder that lists the album folders. You will also see an "index.html" page in this folder. That is the "All Albums" page.
If you only have the EZ-PhotoAlbum tool, you can still create a link to the All Albums page. First, check to make sure that you home page does not already have a link to this page. If you want to go to the All Album page directly from the browser URL, type in your domain name and append "EZ-PhotoAlbum/." For example, "www.mydomainname.com/EZ-PhotoAlbum/" (substitute you domain name for the words "mydomainname")will take you to the All Album page. If you do not have a domain name, then you need to use your subdomain name that you chose when you first set up your account. In this case you would use the following URL, "abc.eznettools.com/mysubdomain/EZ-PhotoAlbum/", substituting your subdomain name for the words "mysubdomain." If you still have questions, contact EZ-NetTools technical support.
|