|
|
|
Instructions and Tutorial
|
|
Call technical support at (208) 356-6687 and they will
assist you with any questions that you may have.
|
|
|
|
1. Go to the website http://abc.eznettools.net to login to your account.
2. Enter your user ID and password to access the EZ-NetTools and to start making you website. (e.i. user ID: x000000)
|
|
|
|
|
1. Once you are logged in you can begin working on your website. Click on the on the tabs at the top of the page to navigate through the tools.
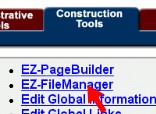
2. The Construction Tools tab will bring you to all of the tools that you will need to edit your site.
|
|
|
|
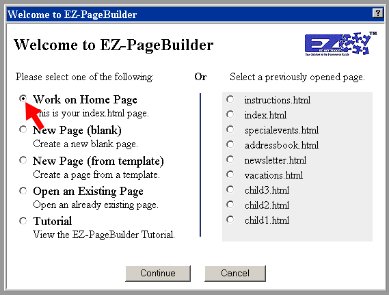
3. To start working on you home page click on the link to the EZ-PageBuilder then choose Work on HomePage.
|
|
|
|
4. The next screen will give you the option of opening the web page you wish to work on select "Work on HomePage" to begin making your website.
|
|
|
You will notice numbered blocks with small icons on the top. The second icon is a pencil. Click here to edit the text in block 2.3.2.
You will use the pencil icon to edit each block in your website. You can roll over each of the other icons to learn their functions.
|
|
|
|
Changing Your Name and Navigation
|
|
1.��Open the index page. Edit (click on the pencil) of block 1. Simply type the name you want to appear on your resume.
*Note on mirror block* You will not need to change the name on the other pages because a "mirror block" was used. When using a mirror block you create a block on a page. If you want the block to be the same on every page, you can add a "mirror block" that will mirror the page. And any time you want to make a change, you simply need to change it on the page you originally created it. Save your changes and it is changed throughout your site. The Colors for the header and navigation are also being mirrored.
2.��To change your navigation edit block 3.1.2. click on "First Column" type in the text you want to appear on the left and on the right you can link to new pages--browse to locate the page you desire. Click "continue" and now "submit"
|
|
|
Changing The Colors on Your Site
|
|
1.��Background Color To change the background color while still working on your homepage, go to the top of the page and click on the "View" Drop Down Menu. Select Global Information. You will notice "Background color" To change the color enter the hexadecimal color code if you know it, or click "EZ-ColorPicker" to select a color. Hit "submit" on the bottom of the page.
2.��Header Go to the File drop-down menu at the top of the page builder page. Select on open. Open the document "colorscheme". Follow the instructions on this page to change the colors of the header.
3.��Link Colors You will follow the same steps as one or two in entering the "Global Information" page. The Link colors are under the "other" section. You simply select a color or enter in the hexadecimal number. Hit "submit" on the bottom of the page.
4.��Sidebar Color To change the sidebar color, you will need to open each page separately. Edit block 3 (click on the pencil) you will see a six digit number in row one, column 3 (#123456) this is where you change the color of your side bar. You can click on the "EZ-ColorPicker" or enter the color code here.
|
|
|
Photograph Sizing and Optimizing
|
|
1.��It is very important that you size and optimize your photographs for the web. If you do not optimize and size your photos, the viewers of your website will wait minutes, perhaps an hour to view your photograph. Keep your "click to enlarge" photos under 30 KB. For your smaller photos, keep the size under 10 KB.
2.��You will want to use a graphics program such as, Ulead Photo Impact or Adobe Photoshop to optimize and size your photographs. Most scanner software packages offer these same options.
3.��Use EZ-FileManager to upload your graphics into the "images" folder.
4.��Edit each graphic block by clicking on the pencil. Browse for your new graphic. Click submit.
|
|
|
|
You use EZ-FileManager to upload your images so that you can use them on your website.
1. First you need to go to your EZ-FileManger to start. It is located in your Construction Tools tab just under the EZ-Pagebuilder link.
|
|
|
|
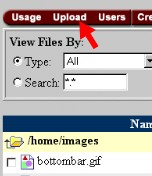
2. After you have opened the EZ-FileManager you will want to select the "images" folder to upload all of your image files to.
|
|
|
3. By selecting the "upload" button it will bring up a window where you can browse and select the images you want to upload.
Help Link: EZ-FileManager
|
|
|
|
|
Password protection is available for your website. If you wish to make each category (e.i. vacations) password protected or any other part of your website password protected.
Help Link: Password protection
|
|
Call technical support at (208) 356-6687 and they will
assist you with any questions that you may have.
|
|