|
|
|
|
|
|
|
|
|
|
|
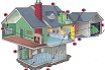
Preventing Water Leaks / Water Intrusion
|
|
Other than just having a high humidity level in the home (due to humid climate), water leaks and other forms of water intrusion into the home or building is the most common reason a toxic black mold problem originates.
Below are types of water leaks and places where unwanted water can enter the home, and ways to avoid these types of water intrusion problems.
|
|
|
|
Condensation or rusting on or around a pipe is a sign of a leak. Covering cold surfaces, such as cold water drainpipes, with insulation helps to prevent condensation.
The most difficult part of preventing leaking pipes is determining whether or not they are leaking in the first place, since they are normally concealed from view.
Here are some signs to look for:
1. You can hear running water sounds when nothing is turned on.
2. Musty odors that seem to originate from walls or floors.
3. Running toilets and dripping faucets.
4. Abnormally high water bills.
5. A water meter reading that changes when you aren�t using any water for an hour.
6. Discolored or damaged walls.
7. A cracked or damp foundation or slab.
8. Warm spots on concrete slab floors, mildew, or excess moisture under carpets.
9. Regular sewer backups.
10. Areas in the yard that are too wet and with unusual plant or grass growth.
|
|
|
|
To prevent water from collecting around the foundation, and seeping up through the walls, make sure the ground slopes away from the foundation.
Here are some additional tips in preventing water seepage through the foundation:
1. Ensure the floor is well ventilated and walls are properly sealed against moisture entry. Polythene put over damp ground can help prevent dampness rising into the house.
2. Insulate your home properly. In the winter, insulated ceilings, walls and floors have temperatures similar to those of the warmer air inside the home, therefore condensation is less likely to form.
3. Prevent rising damp from entering a foundation wall by improving your home�s perimeter drainage. Direct all surface rainwater away from the home through drainpipes, culverts, French drains, etc.
4. If no other methods are feasible, a last resort would be to install either a physical or chemical horizontal damp-proof course.
|
|
|
|
1. Ways to Inspect for a Roof Leak.
A common cause of leaks is from cracked or damaged chimneys. Look for loose brick, cracked mortar joints, and a solid metal or concrete cap on top.
Look for water stains on the inside ceiling, and on the beams in an attic. Beams that have been exposed to water will become weakened and cause a sag in the roof.
Look for any visible damage such as cracks, tears, splits. These will most likely lead to leaking.
Closely inspect all roof penetrations (i.e. skylights, chimneys, vents, etc). Look for signs that the cement is separating from the surface, especially at a vertical penetration of the roof.
Check areas where different materials meet such as metal to brick, shingles to metal, etc. These surfaces expand and contract at varying rates and will pull away from each other. Make sure the seals between materials are tight, not loose.
You can attempt to find a leak from the inside by using a flashlight and tracing the leak uphill.
2. How to Protect/Maintain the Roof.
Inspect your roof at least twice a year. Especially proceeding harsh weather conditions and between seasons.
Roofs will weather under the heat/sunlight. It can essentially be �baked� and become dry and brittle (alligatoring), hence it is more likely to split and eventually leak. Metal components of the roof can rust and corrode, and asphalt-based plastic cement used for seals around pipes, vents, and other penetrations may deteriorate over time and leak. You can apply a coating to some roofs to create a layer of waterproof protection.
3. Ice Dams and Leaks.
Leaks caused by ice dams occur when warm, heated air from the home begins to migrate through the insulation and into the attic area of the house. Without proper ventilation, this warm air collects in the attic area and may warm the underside of the roof decking.
Cold outside temperatures keep the top outside layer of moist.
|
|
|
|
|
Condensation on or around the window is the sign of a excessive moisture. If this is happening, use a sealant around the window to make sure that it is completely air tight.
|
|
|
|
Taking measures to reduce water leakage through the roof, leaky pipes, and the foundation (see above for each of these), as well as through the gutters (below) will go a long way in keeping the walls from collecting too much moisture.
In addition to this, make sure that the air pressure is not too high on the positive side (see Ventilation tips below). However, you do want the air pressure inside to be slightly positive.
Also, make sure that the relative humidity level is below 55% to prevent your walls from taking in too much moisture. Use dehumidifiers if necessary.
|
|
|
|
Clogged or faulty rain gutters can cause excessive water leakage through the walls, roof, and foundation of the home. You can clean your rain gutters with a light broom, a garden hose with a controllable-spray nozzle, or by using one of many gutter-cleaning devices on the market.
Adding perforated covers over your rain gutters will cut down on the frequency of cleaning. Rainwater and some dirt/small debris can permeate the cover but large debris, such as large leaves and twigs, cannot. These covers can typically be found in a local hardware store for only a couple of dollars for about every 4-feet of length.
Make sure your gutters' downspouts are properly cleaned too. Spray water into the gutter or the top of the downspout to ensure it drains freely and with no obstructions. Water must also be diverted away from your home's foundation.
If you don't have a spout going directly into a drain system in your yard and toward the street or a drainage basin, use splash blocks. These relatively small devices will channel the water from your downspout and away from your home and only cost a couple of dollars.
|
|
|
|
1. Put a plastic cover over dirt in crawlspaces to prevent moisture from coming in from the ground. Be sure crawlspaces/basements are well ventilated with good cross ventilation under the house so air will circulate freely. Make sure all vents are unobstructed and repair any torn vent screens. If you don�t have sufficient vents, add more.
2. Get your basement waterproofed through a professional service:
3. Building construction practices to prevent moisture in a new home, particularly in the basement:
Site selection. The first and perhaps most important step is to select a suitable site. Moisture problems are greatly reduced if a home is built on a site with a high water table.
Surface drainage. Landscaping should be graded/sloped to direct rainwater and melting snow away from the foundation. At least six inches over the first ten feet from the foundation wall.
Dampproofing. A dampproof coating on the below grade portion of the foundation wall. Tell your builder you want a high quality, durable waterproofing. A thin dampproof coating is vulnerable to damage during construction.
Floor slab. The basement floor can be a significant source of moisture. To reduce water absorption, the concrete slab should be poured on top of three to four inches of washed aggregate, with a sheet of polyethylene installed beneath the aggregate. Insulating the floor slab saves energy and improves comfort; it also reduces basement condensation in the summer.
Drainage system. An effective exterior drainage system drains bulk water away from the foundation. A channel of coarse rock or drainage tile may be used. The drainage system must be installed on the outside, and near the bottom of the footing
Foundation wall insulation. Foundation insulation may be placed on the exterior wall, be an integral part of the wall, or placed on the interior of the foundation wall. Regardless of where the insulation is plac.
|
|
|
|
Sanitize Cooling Coils
Make sure you periodically wipe any biological growth from the coils. Condensation is continually driping off the coils when the HVAC system is running. This condensation provides a perfect place for mold to grow.
In which case, disinfectant should be periodically applied to the coils. You can also use an in-duct ultraviolet (UV) light air purifier, installed near the coil, to destroy mold before it has a change to grow. It will also destroy mold and other microbes that are caught in the filter.
In-duct ultraviolet (UV) light air purifiers are now being specified by the U.S. government's General Services Administration (GSA), to be used in the ductwork (near the cooling coil and drain pan) of all new federal buildings. Their standards document concerning this reads:
"Ultraviolet light (C band) emitters shall be incorporated downstream of all cooling coils and above all drain pans to control airborne and surface microbial growth and transfer."
Drain Pan
This is where the condensation from the cooling coils drips. If you have a flat drain pan, the stagnant water will become infested with mold growth. In which case, a sloped drain pan should be used, so the water runs off to the proper location. You also need to check to make sure that drain lines are flowing properly.
In addition, the drain pan should be cleaned with a disinfectant on occasion, and should be replaced when corrosion becomes significant.
Filters
Change your HVAC filters on a regular basis. If this is not done, the filter itself can become a fertile breeding ground for all the molds and other biological contaminates that are collected. Once this happens, the spores from the mold will multiply, and will be circulated throughout the home or building through the ductwork.
Insulation
If you have insulation lining the interior of the ductwork, then it should be removed, so you are le
|
|
|
|
In many cases, mold problems can be avoided or caused during the construction of a home or building. In which case, you can take precautions during this phase to save yourself mold headaches down the road.
First, review many of the tips on this page to make sure that the house is built in such a way that as many of these as possible can be put into place.
In addition, avoid using moldy materials, ensure that any fake stucco that is used is installed 100% properly, since this is a common cause for mold growth in exterior wall cavities. If you are really adamant about preventing potential mold problems, then you may want to avoid using fake stucco altogether.
|
|
|
|
An environment that is "dirty" or "dusty" is far more conducive to mold problems than a clean environment. Dirt, dust, and grime are often composed of organic material, which is a staple of the the toxic "black" mold diet.
House dust also serves as a means for locomotion for mold spores, enabling them to spread throughout the home more effectively.
|
|
|
|
Proper ventilation can reduce moisture in the home. Keeping the air pressure in the home or building at a slightly higher level than the air pressure outside will help to ensure proper ventilation. Slightly positive air pressure forces moisture and contaminates outside.
If the air pressurization is the other way around (negative), where the air pressure is higher outside, then it will force moisture and pollutants back into the home or building.
Avoid over-pressurization though (too much of a positive air pressure), since it will cause moisture to be forced into walls and structural cavities, compounding the moisture level inside, and potentially damaging the home or building.
In order to achieve a slightly positive air pressure, adjust the supply ventilation slightly higher than the exhaust ventilation.
Also, try to ventilate appliances and bathroom/kitchen fans outside if possible.
|
|
|
Properly Vent Combustion Appliances
|
|
Combustion appliances include space heaters, ranges, ovens, stoves, furnaces, fireplaces, water heaters, and clothes dryers.
Typically these appliances are safe. However, the combustion process always produces water vapor, if the appliance is not properly vented, it can lead to increased amounts of moisture in the home and provide an ideal environment for mold growth.
Examples of properly venting combustion appliances include equipping ranges with hood fans that are exhausted to the outside, keeping doors open to rooms where these appliances are operating, making sure that the vents are connected and unblocked, and that there are no holes or cracks in the ventilation systems. Finally, make sure that you follow manufacturer instructions when installing and using combustion appliances.
|
|
|
|
|
Firewood often has a little mold growth on it before being brought indoors, since it contains nutrients for mold to grow and thrive. This is not a problem if kept outdoors, but the mold growth can really progress if the firewood is kept in contained areas.
|
|
|
|
|
Replace shower curtains when mold begins to become visible.
|
|
|
|
You may want to use an air purifier to minimize the airborne particulate, which allows mold spores to disperse to other areas of the home or building.
Ionizers are typically better than air filters, since they can remove smaller particles from the air, and do not rely on particulate passing through them in order to remove them from the air.
|
|
|