|
|
|
|
|
|
|
Selling Digital Downloads
|
|
JavaScript, Part 2: Configuring the JavaScript File
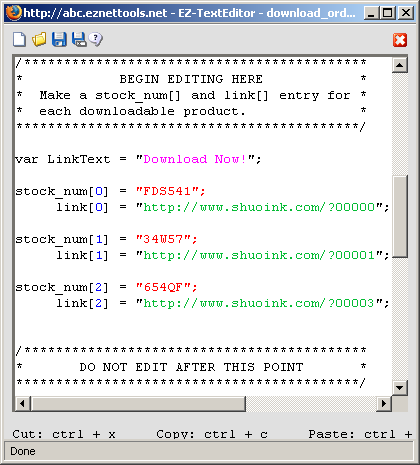
Here's the last step: editing the JavaScript file. You'll need to do this to compile your list of downloadble products, which includes the stock number and a link to the downloadable file. To begin, open EZ-FileManager and find the file you uploaded. It should be named download_order.js in the /home folder. To the far right of the file, you'll see an edit icon ( ). Click on this icon to edit the text file. This will open the file with EZ-TextEditor. Once open, scroll down to the point where you see "BEGIN EDITING HERE" (as seen below). ). Click on this icon to edit the text file. This will open the file with EZ-TextEditor. Once open, scroll down to the point where you see "BEGIN EDITING HERE" (as seen below).

The first thing you may want to change is the text for the link. Changing this is optional. By default, it will say "Download Now!" and if you'd like it to stay like that you don't have to change it. In the example above, that text is highlighted in purple. This will be what the customer sees when they see the download link.
Now you can begin adding products. Each product has a sequential number, highlighted in blue in the example above, between two brackets. Note: this is not the stock number for the product. It is a sequential that identifies that product within the list for the JavaScript. The first product must be [0], the second: [1], the third: [2], the fourth: [3], and so on until the last. They must be sequential for it to work properly.
Each product has two options:
- The stock number is highlighted in red in the example above. This must match exactly the stock number of the product in your catalog.
- The link to the digital file or page is highlighted in green in the example above. For example, if you are selling an mp3 file you'll put in the full address to the mp3 file. That might look like this: http://www.yourdomain.com/mp3files/song.mp3
Note: You do not need to add every product in your catalog to this list if they are not all downloadable. If one of your products is a tangible item or a service, you will not need to include it in this JavaScript file.
When you're done editing the file, make sure you click on the save button. Then click the red X to close the text editor.
Section 5 - Conclusion
|
|
|
|