|
|
|
Preparing Photos for the Web
|
|
|
Part 4 - Optimize Photograph File Sizes
|
|
|
The file size of a photo IS THE DETERMINING factor in the load time for a picture or graphic. As mentioned above the dimensions of the photo are one factor in determining the file size. However, how the photo is optimized has a greater impact on download times. Optimizing photographs is a process that analyzes the picture and compresses areas of the photo that have the same color. Most software packages allow you to select how much you want to compress, usually a percentage. As the compression percent increases (or deceases depending on the software) the quality of the picture will begin to deteriorate. Some software will actually display an image as the compression occurs so you can determine if you have gone too far.
|
|
|
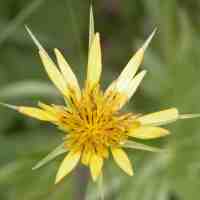
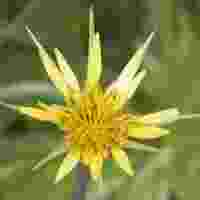
Typically a photo can be compressed by 50 percent without much discernible difference in the image. Consequently, 50 percent compression is usually a good compromise between photo quality and file size. The four samples below will give you some idea of the impact of compressing on file size and quality. Notice that the file size decreases rapidly as you increase the compression but then starts to diminish as the compression continues. Even compressing a little brings impressive results in file size reduction. However, you will reach a level of compression that will be too much.
|
|
|
|
|
|
|
Photos for a web page do not need near the quality that is required for printing. As you can see above, a photo can be highly compressed and still look very good on the web. Compressing your photos and graphics will have the greatest impact on load time of your pages over any other element on your page. In fact, graphics that have few colors can be highly compressed with very small decrease in quality. (In this later case, saving them as a .gif format provides the smallest files and best quality.)
|
|
|
How do you optimize your photos? Usually the optimize feature is part of the process to save a file. Select a file type of JPEG or JPG. If you do not readily see place to select compression level then look for a button of options on the SAVE or SAVE AS options. Unfortunately, each program specifies the compression level differently. For some, a high percentage means high compression resulting a small file, while others, it is the opposite, a low percentage results a small file size with high compression. Experiment.
|
|
|
IMPORTANT NOTE: When you assign names to the image file, do not to include spaces in your file name. You can use such file names on your PC but the server hosting your web site cannot recognize a file name with spaces. In your file name, you can use an under line. For example “my pets” is not valid, but “my_pets” is a valid file name.
|
|
|
|