|
Processing Credit Cards in the Billing System
|
|
|
|
|
|
This is the third in a series of articles explaining how to use the accounting features of the reseller tools of EZ-NetTools. This article will explain how to accept and process credit card payments for monthly fees from your members.
The first two articles on this series were an overview of the EZ-NetTools Accounting features and how to set up a basic accounts receivable system. While the subject of this article is not required for a basic receivable system, it is certainly a very helpful feature. In the future we will discuss some more advanced features of the receivable system. These advanced features are not required, but certainly automate a number of routine tasks that can become cumbersome as you get more and more member accounts.
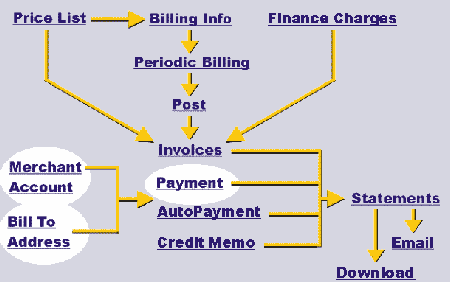
After you have followed the steps in this article and are set up to process credit cards online, you can eliminate some paper associated with payment transactions. During this article I will discuss the three Accounts Receivable options highlighted in the graphic below. As you review this article you may find it helpful to open another browser window and follow along in the tools as you read.
|
|
|
|
|
Preparing to accept credit cards online
|
|
In order to process credit cards online, you need two services: a merchant account and a credit card gateway. In the last issue of the Reseller Edition of the EZ-NetAdvantage these services were discussed in some detail. While this previous article explained our new alliance with two companies, there is some good information about both merchant accounts and credit card gateway services. (Note, you can accept credit cards without processing them online by using a terminal or by submitting manually created payment slips to your bank. If you choose to process credit cards this way, you do not need to read the rest of this article).
Once you have your merchant account and credit card gateway service, you need to configure EZ-NetTools with this information. You do this by clicking on the Accounting tab of the Reseller menu and selecting the Accounts Receivable link. Then, click on the Merchant Account link (as displayed in the above graphic).
The configuration options for collecting payments in your Accounts Receivable is identical to the configuration for setting up e-commerce payments in an e-commerce member account.
|
|
- First, you select the payment methods you wish to accept. For this article, we are only interested in the credit cards. So, put a check by Credit card.
- Next, click on the configure option to the right of credit cards.
- Now, in the top part of the page you will check the credit cards you accept.
- Next, on the bottom half of the page, you need to configure the gateway. Do this by checking either Authorize.net or Quick Commerce.
- Click on the configure link to the right of the gateway you selected. Enter your login ID and your password (if required). Once you click save, the system will verify that your account number and passwords are correct. Return to the payment configuration.
- It is very important that you click save from the Configure Payment Method page in order for all these changes to take effect.
- From the Select Payment Option page select submit to record your changes.
|
|
|
Now your accounts receivable system recognizes your merchant account and gateway so it knows where to send credit card transactions.
|
|
|
Three ways that credit card payments can be processed
|
|
|
There are three different ways that credit cards can be processed in the receivable tools, one way you process credit cards and two ways that your member accounts can process credit cards.
|
|
- The first and most obvious method is the payments tool within the Reseller Accounts Receivable tools themselves. With this tool you can record and process a payment at the same time.
- The second way is within the accounts payable system in the member tools provided by EZ-NetTools. Through this tool, your member can make a payment to you. I will explain this method in more detail in a future EZ-NetAdvantage article. (You will note that in the Reseller tools, there is also an Accounts Payable feature. This is a way that you can make your payments to ICServ. This tool is exactly the same tool your members use to pay you).
- Third, when a statement is emailed to your member, there is a link in the message that will take the member to a web page to make a payment without having to log into their account directly. I call this process a One Click payment.
|
|
|
The first and third methods will be explained in more detail below. The second method is the subject of the next article in this series.
|
|
|
Processing credit cards within Accounts Receivable tools
|
|
The most common method of processing credit card payments is with the payments option as seen on the Accounts Receivable menu. You will process the payment similarly to the way we described how to do it in February's advantage. The previous article described how to record a payment. Now we will describe how to process the credit card at the same time you record it. This difference will come at the very end of the payment recording process.
Select the Payments link from the main receivables menu (Refer to the highlighted link in the graphic above). You will see the account selection page as you have seen before. Select the member account you want to record the payment for and click the submit button. You will be taken to the Payment history page. If there are no payments for this account the list will be blank. To add a payment perform the following steps.
|
|
- Click the Add button.
- If you wish, you can change the billing address of the member account.
- Enter the document number. You can put in any number you want.
- Enter the amount of the payment. The amount will default to the amount due, but you can change the amount if you need to.
- Enter a description for the payment. This will appear on the list in the payment history page.
- The date created is determined by the system and cannot be changed.
- The accounting date can be any date you wish. It will default to today's date.
- In the comments area, you can document information you want to remember about the payment. For example, you could note that the payment is for the sign up fees and the first months fees. (Be judicious with your comments because your members will be able to see them from their Accounts Payable tools).
- When you are done, click on the process button. You will only click process if you wish to charge a credit card right now. Up to this point, the process has been the same as was discussed in the previous article.
- Next, you will see a page where you put in personal information and credit card number. This personal information will be prefilled with the billing information as entered in the member accounts contact information. If you wish, you can change this personal information. (If you make a change, it will only be for this transaction. It will not update the billing information. We will explain how you can do this below).
- Enter the credit card information. (Below we will explain how you can have the system remember this information for future use).
- Click the submit button. If the credit card was accepted by the gateway processor, you will be directed to a page that will indicate that the transaction was approved. You will be given a transaction number as well as an authorization code. You can print this page if you wish.
- Click finish when you are done.
- You will return to the Payment History page. You should be able to see and edit the payment you just entered. At this point the payment has been recorded in the Accounts Receivable system and the credit has been processed.
|
|
Once you have completed a payment, it is a good idea to verify that everything was processed correctly. Click on the Statement link to verify that all the invoices and payments are correct. You can verify that the credit card has been processed by logging into the gateway web site and checking the unsettled transactions. Your gateway service should also provide you will a daily summary of all credit card transactions that were processed during the day.
If you process a number of credit cards online, you may want to set up a series of cross checks. For example, at the ICServ main office, we keep a spread sheet of all transactions processed each day by type of credit card. We review the daily report from the credit card gateway. At the end of the month, when the credit card company send us a statement, we compare it to our spreadsheet totals.
|
|
|
Configuring the Bill To Address
|
|
|
The Bill To Address link is used to configure the billing information about your customer, not just the address. Besides the billing address information, there are indicators of how the customer wants to receive their statement. If you have permission from your customer you can also store their credit card information so that you do not have to enter it every time.
|
|
- Click on the Bill to Address Link. (Refer to the third highlighted link in the graphic above.)
- Select the customer whose personal information and credit card information you wish to record.
- Enter the name and address information. This information will already be filled in if your member has entered their billing contact information from their member tools. Since your receivables system shares the exact same record as your member billing contact information, any changes you make here will also change your member's billing contact information. The reverse is true as well.
- If you have your customer's permission, you can also record their credit card information. Enter the name as it appears on the credit card.
- Enter any special instructions. These instructions will appear when you process a payment for this customer using a credit card.
- Auto Payment. We will discuss this more in a future article.
- Day of the month to pay. We will discuss this option more in a future article.
- The Billing notification method indicates whether the member wants to receive their statements by mail or email. This is an informational field only. There is no process in EZ-NetTools that uses this information. (In a future article we will explain how we use this information in a PC based database to generate printed statements. This can be especially helpful if you have a large number of accounts).
- When you are done, click submit to update the information.
|
|
|
Once you have entered this billing address information, it will be used as the default information on all future payment transactions. Keep in mind that your members can also change this information if they wish. You will also note that when you display this information again, that part of the credit card information is masked. This is for security purposes.
|
|
|
Payment Processing using One Click
|
|
|
The final payment method discussed is the One Click method. This method is initiated from the statement that you send to your member via email. The process is quite simple and self explanatory.
|
|
- From the link on the statement the person clicks the one click link.
- The person is taken to a page that already has the payment information filled out from their billing information.
- Your customer can change the amount they wish to pay. It will default to the amount due.
- Once they have clicked the submit button, the credit card will be processed.
- If the credit card was accepted, they will then receive a confirmation indicating the success.
|
|
|
|
Using online credit card processing can make it easy to process payments from your member accounts. If you have many credit cards to process, you can save time by utilizing these tools. At the home office of EZ-NetTools, we use these exact same programs to process our credit card payments from resellers, like you. So we know the processes work. With these tools and ones that will be explained in the future, we are able to process the invoices and payments for thousands of accounts with minimal effort. These same tools are available to you.
In next article I will discuss the mirror side of receivables, the accounts payable tools.
|
|
|
|