Add / Change Categories
You get to this function by selecting the option Edit Categories on the EZ-Catalog main menu. This is accessed from the Construction Tools menu. To leave this option, press the Submit button.
You will initially see a display that shows all the categories on your site. To add a category, click the button labeled Add Category. To delete or edit a category, select the Delete or Edit tag that is next to the item that you want to change or delete.
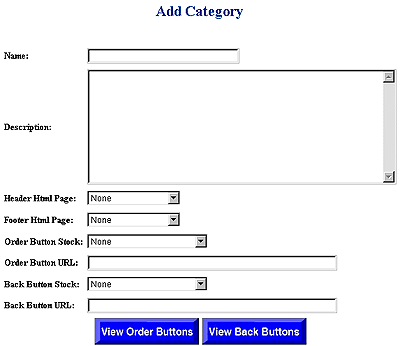
When you select the option to Add or Edit
a category, you will see this display:

![]() Name:
Enter a category name of up to 40 characters.
Name:
Enter a category name of up to 40 characters.
![]() Description:
Enter a description of the category. This may be up to 1,000 characters.
Note, however, that the display of this item does not 'wrap' the text and
that you will need to code '<BR'> (an HTML code for a line break) every
place that you want a new line. To keep the customer from having to scroll
left and right while reading the page, you need to do this at least every
80 characters.
Description:
Enter a description of the category. This may be up to 1,000 characters.
Note, however, that the display of this item does not 'wrap' the text and
that you will need to code '<BR'> (an HTML code for a line break) every
place that you want a new line. To keep the customer from having to scroll
left and right while reading the page, you need to do this at least every
80 characters.
![]() Header
HTML: If you have HTML code that you want to display at the top of
the page of this category, enter the name of the code block here (it must
have been previously uploaded).
Header
HTML: If you have HTML code that you want to display at the top of
the page of this category, enter the name of the code block here (it must
have been previously uploaded).
![]() Footer
HTML: If you have HTML code that you want to display at the bottom
of the page of this category, enter the name of the code block here (it
must have been previously uploaded).
Footer
HTML: If you have HTML code that you want to display at the bottom
of the page of this category, enter the name of the code block here (it
must have been previously uploaded).
![]() Order
Button Stock: If you want to specify a custom button to invite the
customer to go to the order form, you may select one from a list that shows
both the standard buttons and the graphics files that you have loaded.
Order
Button Stock: If you want to specify a custom button to invite the
customer to go to the order form, you may select one from a list that shows
both the standard buttons and the graphics files that you have loaded.
![]() Order
Button URL: If you want the customer to be transferred to another location
(on or offsite) when the Order button is pressed, enter that address here.
This must be the absolute Internet address in the format http://www.domainname.domaintype/pagename.
Order
Button URL: If you want the customer to be transferred to another location
(on or offsite) when the Order button is pressed, enter that address here.
This must be the absolute Internet address in the format http://www.domainname.domaintype/pagename.
![]() Back
Button Stock: If you want to specify a custom button to invite the
customer to go to the site's main page, you may select one from a list that
shows both the standard buttons and the graphics files that you have loaded
Back
Button Stock: If you want to specify a custom button to invite the
customer to go to the site's main page, you may select one from a list that
shows both the standard buttons and the graphics files that you have loaded
![]() Back
Button URL: If you want the customer to be transferred to another location
(on or offsite) when the Back button
is pressed, enter that address here. This must be the absolute Internet
address in the formathttp://www.domainname.domaintype/pagename.
Back
Button URL: If you want the customer to be transferred to another location
(on or offsite) when the Back button
is pressed, enter that address here. This must be the absolute Internet
address in the formathttp://www.domainname.domaintype/pagename.
When you are satisfied with your data, press the Submit button.