Adding/changing Items
You get to this function from the EZ-Catalog menu, which is accessed from the Construction Tools menu. You leave this option by pressing the button labeled Back to Edit Catalog.
If you are not using the automated data import feature, you will use this option to add, change and delete your catalog items.
If you DO use automated import, you should note that all additions and changes that you make with this option will be erased the next time you import your database.
Importing is easy! If you use importing, It is almost always better to make the changes on your local system and transfer them automatically than it is to use this option.
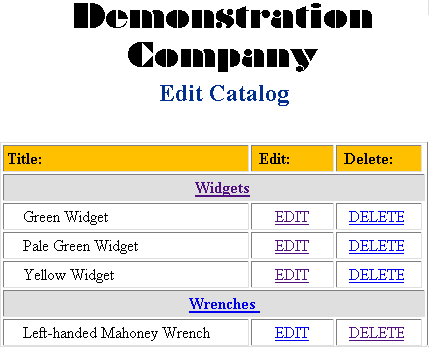
Your catalog will be displayed in the following format:

To delete an item, press the Delete button adjacent to the item name. To manually add or change an item, press the Add Item button or the Edit button adjacent to the item name.
Note that the order in which the items are added to your catalog is very significant. The catalog items are displayed to the customer in the same order that they are added to the file. The purpose of this feature is to enable you to control the order of the items in the catalog.
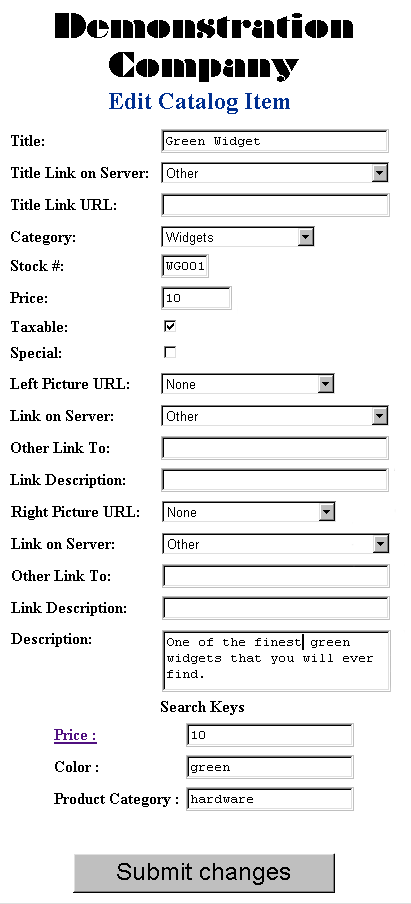
If you choose to edit or add an item, you will see the following display:

![]() Title:
This is the name of the item that you are offering for sale.
Title:
This is the name of the item that you are offering for sale.
![]() Title
Link on Server: If you want the title of the item to be an active link
to another page on your site (for instance, if you have a page or picture
that more fully describes the item), enter the name of that page here.
Note that this may be a graphics object as well as a program or function
page.
Title
Link on Server: If you want the title of the item to be an active link
to another page on your site (for instance, if you have a page or picture
that more fully describes the item), enter the name of that page here.
Note that this may be a graphics object as well as a program or function
page.
![]() Title
Link URL: If you want the title of the item to be an active link to
a page somewhere else on the Internet, you may enter the URL of the link
here. This should be the absolute address of the linked page in the format
'http://www.domain.domaintype/page'.
Title
Link URL: If you want the title of the item to be an active link to
a page somewhere else on the Internet, you may enter the URL of the link
here. This should be the absolute address of the linked page in the format
'http://www.domain.domaintype/page'.
![]() Category:
You must select the category in which the item is to be displayed. Click
the down arrow next to the Category
box to see your choices. To add or change
a category, leave this screen and select the Edit
Categories button at the bottom of the display titled 'Edit
Catalog'. When you are finished, return here.
Category:
You must select the category in which the item is to be displayed. Click
the down arrow next to the Category
box to see your choices. To add or change
a category, leave this screen and select the Edit
Categories button at the bottom of the display titled 'Edit
Catalog'. When you are finished, return here.
![]() Stock
#: Enter the stock number of the
item. This field is required if you are using the shopping cart feature.
Stock
#: Enter the stock number of the
item. This field is required if you are using the shopping cart feature.
![]() Price:
Enter
the item price.
Price:
Enter
the item price.
![]() Taxable:
If
the item is taxable in any state that is listed in your taxation table,
check this box.
Taxable:
If
the item is taxable in any state that is listed in your taxation table,
check this box.
![]() Special:
Check this box if you want the word 'special' to appear next to this item
during the ordering process,.
Special:
Check this box if you want the word 'special' to appear next to this item
during the ordering process,.
![]() Left
/ Right Picture URL: If you wish to display pictures of this item,
enter the name here. To view a list of all pictures on your website, use
the down arrow button to the right
of the field.
Left
/ Right Picture URL: If you wish to display pictures of this item,
enter the name here. To view a list of all pictures on your website, use
the down arrow button to the right
of the field.
![]() Link
on Server: if you want either or both of the pictures of the item to
be an active link to another page on this site (for instance, if you have
a page or picture that more fully describes the item), you may select the
name of that page here . To view a list of all possible links, use the
down arrow button to the right of the
field.
Link
on Server: if you want either or both of the pictures of the item to
be an active link to another page on this site (for instance, if you have
a page or picture that more fully describes the item), you may select the
name of that page here . To view a list of all possible links, use the
down arrow button to the right of the
field.
![]() Other
Link To: If you want either or
both of the pictures of the item to be an active link to a page somewhere
else on the Internet, you may enter that name here. Enter the full URL
of the page in the format 'http://www.domain.domaintype/page'.
Other
Link To: If you want either or
both of the pictures of the item to be an active link to a page somewhere
else on the Internet, you may enter that name here. Enter the full URL
of the page in the format 'http://www.domain.domaintype/page'.
![]() Link
Description: If you want text to appear under either or both of the
pictures, enter it here. One use this feature might be to display the value
"ORDER NOW!" beneath the image if you are using it as the link to an off-site
ordering location such as Amazon.com.
Link
Description: If you want text to appear under either or both of the
pictures, enter it here. One use this feature might be to display the value
"ORDER NOW!" beneath the image if you are using it as the link to an off-site
ordering location such as Amazon.com.
![]() Description:
This field can contain up to 1,000 characters of information describing
the item.
Description:
This field can contain up to 1,000 characters of information describing
the item.
![]() Search
Keys 1-10: You may enter up to
ten search keys for each record. Search keys do not appear in the catalog
display. However, if your site has an inventory search engine, the
keys can be used by the customer to customize their view of your catalog.
The content of the seach keys is separate from any other record content.
This means that you can, for instance, create a search key called 'new'
and place the value 'new' in the key field of only those records that have
changed. When the customer uses the search engine, they may then specify
that they want to see only records with a search key value of 'new'.
You specify the titles for the search keys in the item
display configuration screen.
Search
Keys 1-10: You may enter up to
ten search keys for each record. Search keys do not appear in the catalog
display. However, if your site has an inventory search engine, the
keys can be used by the customer to customize their view of your catalog.
The content of the seach keys is separate from any other record content.
This means that you can, for instance, create a search key called 'new'
and place the value 'new' in the key field of only those records that have
changed. When the customer uses the search engine, they may then specify
that they want to see only records with a search key value of 'new'.
You specify the titles for the search keys in the item
display configuration screen.
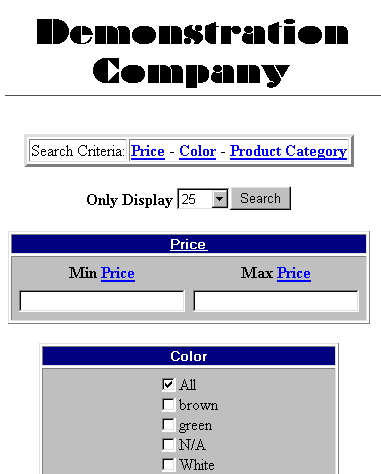
The exact format of the search display
will vary, depending on the keys that you have specified. In the
demonstration case below, the keys were titled 'Price', 'Color' and 'Product
Category' in the item
display configuration screen. When each item was added to the
catalog, the item price was entered in the field titled 'search key 1',
the item color was entered in the field called 'search key 2', and a product
catagory name was entered in the field 'search key 3'. The 'price'
key is specified as a range search, the 'color' key is not. As a result,
all the different values in the database for the color key are displayed
and the customer is able to check the boxes and choose which individual
colors they want:

When you are satisfied with the content of your item record, press the button labeled Return to Main Menu.