|
|
|
Mastering the Advanced Text Block
|
|
|
|
The options listed below are for adding and editing objects. To add an object, place your cursor in the location that you want the object placed, then click on the appropriate button for the object that you want to add. To edit an object, select the object. If you select it in the text area, small boxes will appear that allow you to resize the object (if it is resizable). If you select the object from the bottom in the breadcrum HTML tags area, the tag will be highlighted in a dark gray color. After the object is selected, click on the button that matches the object. This will allow you to edit the objects settings.
Bookmark (anchor)
This button is to be used in conjunction with the hyperlink button. 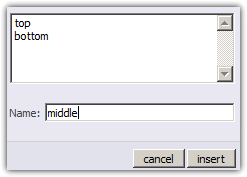 It creates a bookmark within a page, that you can link to. Then, when a user clicks on the link, the page will scroll up or down to the location of the bookmark. To create a bookmark/anchor, click the bookmark button and then type a name for the bookmark. Click insert, and then click Ok. You'll notice it puts a # symbol in your text. You can remove that if you like. We'll show you how to link to your bookmark later on. It creates a bookmark within a page, that you can link to. Then, when a user clicks on the link, the page will scroll up or down to the location of the bookmark. To create a bookmark/anchor, click the bookmark button and then type a name for the bookmark. Click insert, and then click Ok. You'll notice it puts a # symbol in your text. You can remove that if you like. We'll show you how to link to your bookmark later on.
Flash
This button will allow you to add a Macromedia Flash animation to your web site. You'll have to provide the following:
- Source file - You can use EZ-Browse to find this if you have already uploaded it to your account.
- Background color
- Width
- Height
- Quality
- Alignment (left, right, top, bottom)
- Loop (Yes or No)
Form Editor
This button lets you create a web form. Forms are used for gathering information from your web site visitors. Since there are several different types of objects that make up a form, there are multiple options to choose from when you click the form editor:
- Form
- Text Field
- List
- Checkbox
- Radio Button
- Hidden Field
- File Field
- Button
First you need to add a form. This "form" surrounds all of the other elements and tells those elements where and how to send their information. When you create the form, you'll be asked to provide a form name, action, and method. "Action" is the web page that this information will be sent to. Note here that you cannot specify an e-mail address. If you want to send form data to an email address, we recommend using a form builder block instead of the advanced text block. The "method" is how the information is sent. If you choose "get", the information will be visible to the user as a part of the address bar on the page the information is sent to. If "post" is selected, the information will be hidden. Next, you need to add form fields. Each varies in its properties but they are all pretty straightforward. Lastly, you must add at least one form button, the submit button. When you add the button, change the type to submit. Change the value to the text you want displayed on the button. Once you've done that, your form is complete.
Remember, unless you have a web page that is able to automatically process the information contained in your form, the form will not function. We recommend using EZ-PageBuilder's form builder blocks to create forms that will send information in the form of an email message.
Hyperlink
This button will change the selected text into a link. Depending on your settings, a link is usually blue and underlined. When you click on the link it will take you to another page, or to a different location on the current page. To create a link, click on the hyperlink button. If the page you want to link to is on your own website, you can use the folder icon to browse for the page. If not, you'll need to type the full web address of the page you want to link to. To link to a bookmark/anchor, simply select the anchor name from the bookmark drop-down list. Hit Insert, then Ok, and you're done.
Image
Adding a picture to your web site is simple. Click on the image button. Then hit the folder icon to browse for an image. If you want, you can also add borders, change the size of the image, and change the alignment.
Then just hit "insert" and "Ok".
Line
This line button will simply insert a horizontal line wherever your typing cursor is located, like the one below:
Media
If you have some audio or video that you would like to include, this button will allow you to do that. Simply select the audio or video file and configure a few settings and you're done.
Symbol
Rather than using copy/paste to get special characters onto the page, you should use the symbol button. Then select the symbol you want to include. Doing this will ensure that everyone will be able to see the symbol, regardless of the operating system or web browser they are using.
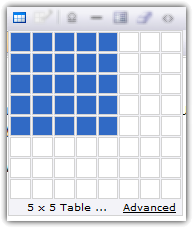
Insert Table
 To insert a table, click on the table button, and a table size selector will appear. Each little box represents a cell in your new table. Click on the appropriate box to make your table the right size. If you need a table with lots of rows and columns, hit the advanced link to do so. When you initially create the table, it will look somewhat like the one below: To insert a table, click on the table button, and a table size selector will appear. Each little box represents a cell in your new table. Click on the appropriate box to make your table the right size. If you need a table with lots of rows and columns, hit the advanced link to do so. When you initially create the table, it will look somewhat like the one below:
Edit Table/Cell
Once you've created a table, you can use the "edit table/cell" button to edit either the entire table or an individual cell in the table. There are many options, such as size, background color, border, and so on.
|
|
|
|
|

