|
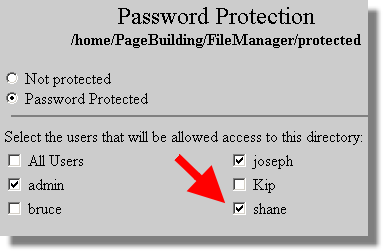
Before you can protect a folder, it must be created. You can either create a new folder or protect an existing folder. Note, you do not need to indicate which files in the folder you wish protected. Once a folder is protected, everything in the folder is protected, even the graphics. If you put a page in a non protected folder, but use a graphic that is in a protected folder, a user id and password will be required before the graphic can be displayed. Click here to see what I mean. Now, let's protect a folder.  Find the folder you want to protect. Then click on the icon of a open lock that is to the right of the folder name. Find the folder you want to protect. Then click on the icon of a open lock that is to the right of the folder name. - On the page titled Password Protection, you will see a list of all of the users you have created. Check the ones that you want to have permission to view the contents of the folder. Note that you can select to give All Users permissions if you would like.

 When you are done, click on the “Update” button. You will return to EZ-Filemanager. You will notice that the icon associated with the folder now is of a closed lock where as before it was an open lock. When you are done, click on the “Update” button. You will return to EZ-Filemanager. You will notice that the icon associated with the folder now is of a closed lock where as before it was an open lock.
In the future, if want to change who can view a page, click on the lock button to return to the above listing of users. By removing the check box, you remove their permissions to see anything in the folder. Pages located in protected cannot be viewed without typing in a user name and password, even from within EZ-FileManager. In EZ-PageBuilder you can see the work file but you will not be able to “view current” without entering the user name and password. Would you like to see how it works? Click here to go to a page that is located in a password protected folder. You will be prompted for a user and password which are "student" and "password" respectively
|